Hot Spot/Hot Area (item type)
Hot Spot/Hot Area item types require candidates to provide a response by selecting one or more 'hot spots' or 'hot areas' on an image that correspond to information provided in the question/stem.
- Hot spot items require candidates to select specific spots on an image to provide a response. When a spot is clicked, an "X" is placed in that spot. Candidates can select a spot anywhere on the image, while authors designate specific spots as correct or incorrect. Unlike hot areas, candidates cannot see hot spots defined by the item author.
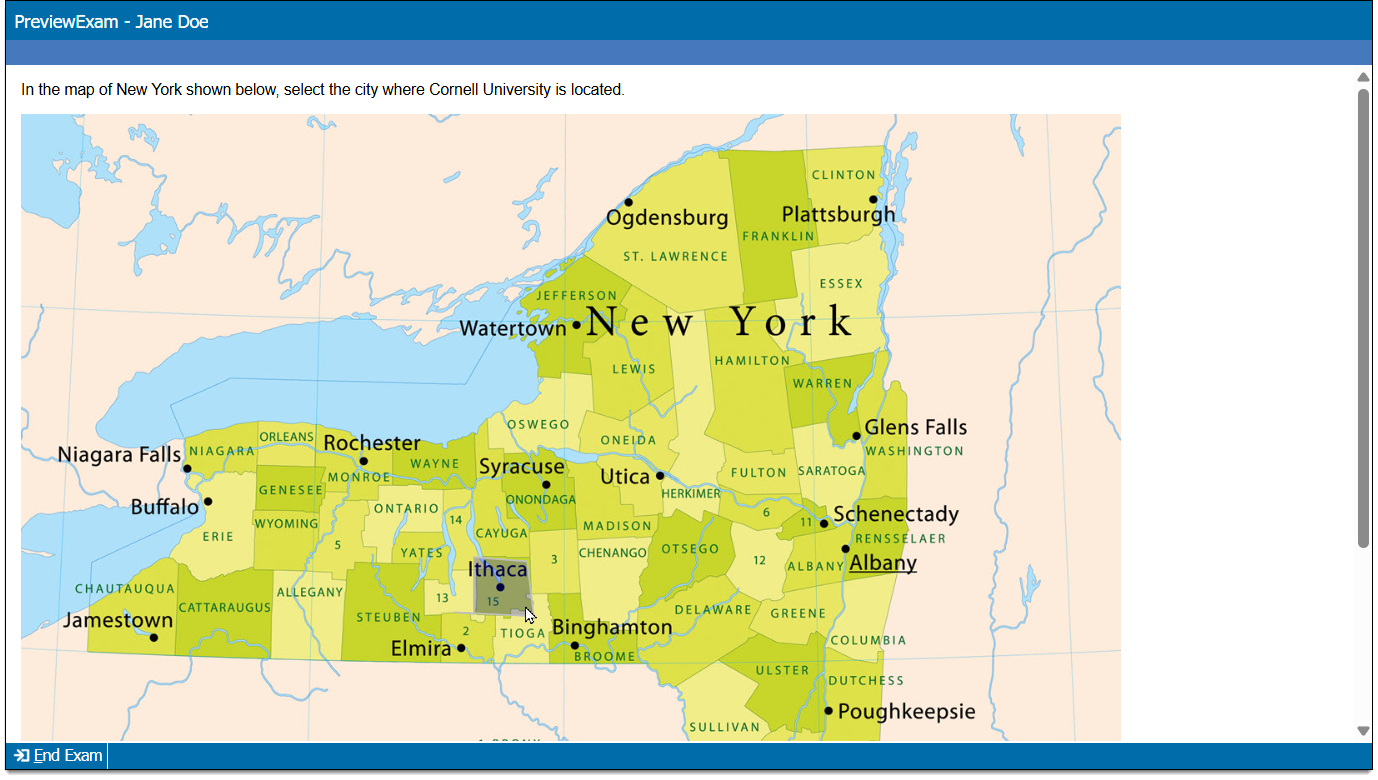
- Hot area items require candidates to hover over the image to find and select predefined areas to provide a response. When a hot area is selected, the area is displayed as highlighted. Unlike hot spots, candidates can see hot areas defined by the item author and they are only able to select those defined areas (they cannot select anywhere else on the image).
Candidates may be required to select all of the correct spots/areas and none of the incorrect spots/areas to earn the point for the item, or if advanced scoring rules are used, they can accumulate a certain number of points for each correct spot/area. Candidates can only select as many areas as the item author has configured as correct. (For example, if there are four hot spots and only three are marked as correct by the item author, the candidate can select up to three spots for their response.)
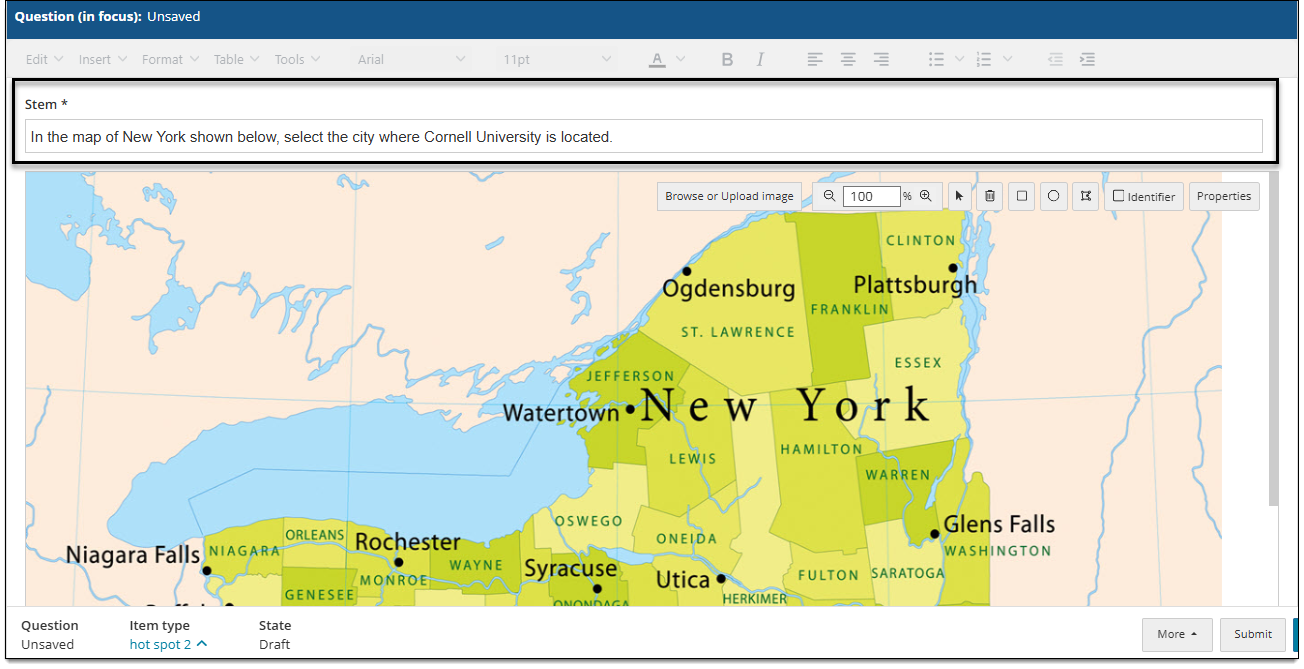
Add the item stem
|
*Note: Each content component (the stem or question) contains either text or media and may have a custom label. For example, a text component may be labeled as "Question" or "Stem", and a media component may be labeled as "Media", "Video", or "Audio". |
- In the Content component* field(s), enter text or upload the required media file type, depending on the item requirements.
- For text components, you can format text or add tables, images, and equations.
- If configured for your project, some text components (such as stem and basic response options) can include variables or dynamic text. (These are not available for all item templates or text fields.) View unsupported item typesView unsupported item types
Variables not supported for:
- Display
- External QTI
- Selectable text
- Audio capture
- Audio capture with video
- Some custom templates (depends on configurations)
Dynamic text not supported for:
- Audio capture
- Audio capture with video
- Selectable text
- Some custom templates (depends on configurations)
- If configured for your project, some text components (such as stem and basic response options) can include variables or dynamic text. (These are not available for all item templates or text fields.) View unsupported item typesView unsupported item types
- For media components, you will only be able to add the types of media configured for the item type (for example, you may be able to add audio files such as MP3, but not video files such as MP4).
- For text components, you can format text or add tables, images, and equations.
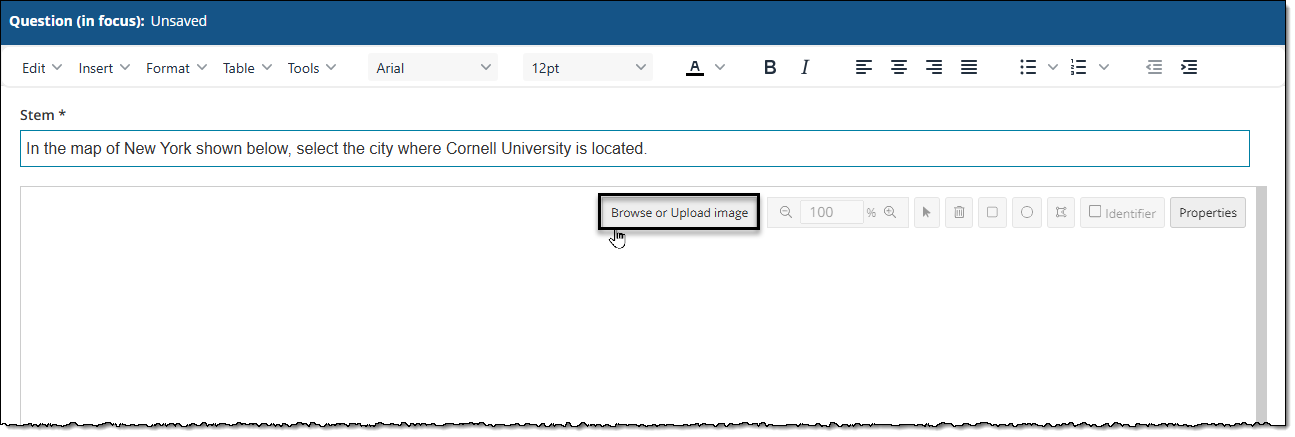
Insert the image
- In the image toolbar, click Browse or upload image.
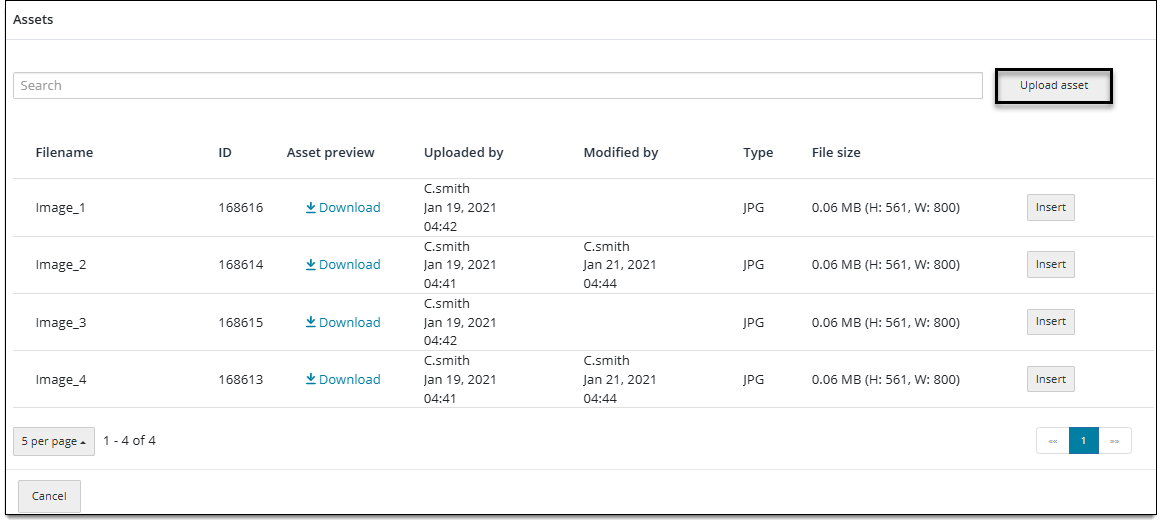
- Click Insert for the desired image.
- The supported file types are JPG, JPEG, PNG, and SVG.
- If you don't see the asset, it has not been uploaded to the current project. Click Upload asset to add it.
 When an asset is uploaded to this item, it will also be available in the asset library for other items.
- The image is added to the item. If needed, change the resolution of the image area in the hot spot/hot area properties ↓ to maximize the quality of the image display and/or prevent scrolling required to view the entire image.
Change the image
- In the image toolbar, click Browse or upload image.
- Click Insert for the desired image.
- The original image will be replaced with the new image you just selected. The hot spots or hot areas you added will still be present in their original location. You will need to move or delete them as needed to align them on the new image.
Set hot spot/hot area properties
|
|
- In the image toolbar, click Properties.
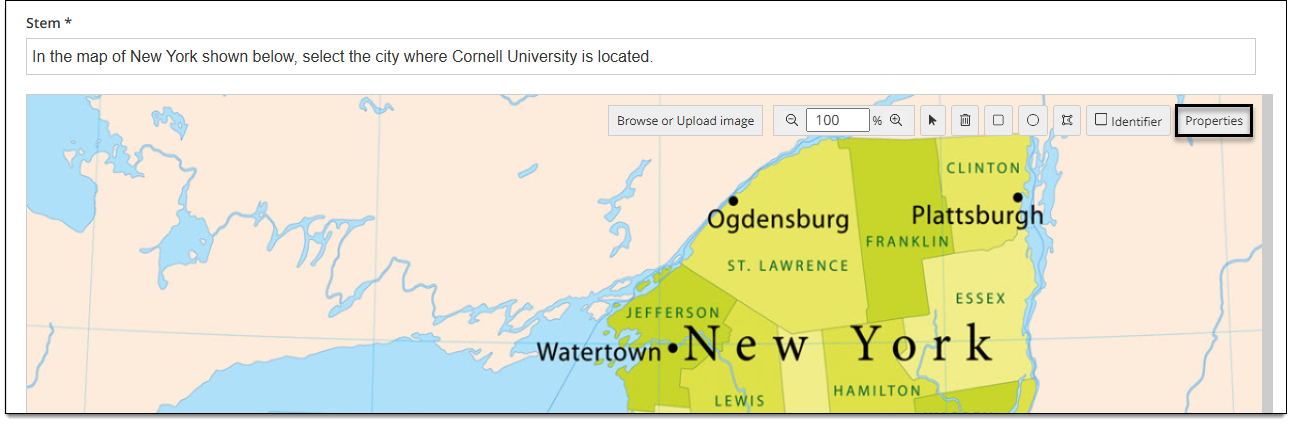
- Add or modify properties as needed. *Properties marked with an asterisk are only available if permissions are enabled for the template you are using.
- *Response type: Choose Hot spot or Hot area to determine how the candidate will interact with the image. (Refer to the top of the page ↑ for a comparison of these types.) Depending on the template settings, this option will be pre-populated or you will be required to choose an option.
- *Scoring rules: Choose a scoring rule ↓ to determine how the item will be scored. If you choose Advanced, you must also define the weight ↓ for each hot spot or hot area that you draw on the image.
- *Resolution: Choose a display resolution that best contains the image that you are using. This impacts whether the candidate will be required to scroll to view the entire image, or how small or large the image will appear.
- Weight: (This setting only appears if Advanced is selected as the scoring rule.) Refer to Set weighted scoring ↓ for more information.
- Item response
- Correct: All hot spot/hot area shapes are configured as correct responses by default. Deselect/clear the checkbox for any shapes in the Correct column that should be scored as incorrect.
- Identifier: This is the identifier of the response option (the hot spot or hot area) such as A, B, C, etc. You cannot change the identifier values but you can show or hide them in the image editor ↓.
- Shape label: This can be customized to help you identify each hot spot or hot area when configuring the item or its properties.
- Weight: These fields are only shown for each spot/area if Option is set as the Weight type for weighted scoring ↓.
Draw hot spot/hot area shapes
Hot spots and hot areas are the 'response options' for the item that are drawn over the image by the item author.
|
For Hot spot items, candidates can click anywhere on the image to select a response but they cannot see the hot spots defined by the item author. Make sure the hot spot shapes are large enough for candidates to have some margin of error when making their selections. For Hot area items, candidates will only be able to select the hot area shapes defined by the item author, but they can see the defined areas. |
Draw a circle or square
- In the image toolbar, click the circle or square shape button.
- Click and drag your cursor over the area you want to set as a hot spot/hot area. Draw it large enough so you can easily move, resize, or delete it.
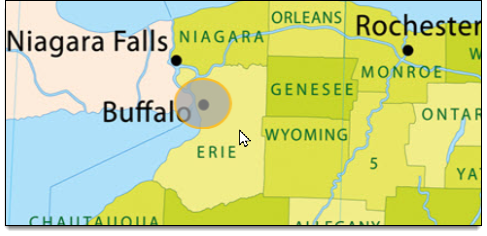
- Release your mouse pointer to set the shape.
- The hot spot/hot area is highlighted and its option label is displayed in the center of the shape.
- If needed, you can move, resize, or delete the shape ↓ or change the option label.
Draw a polygon
Polygons are useful for defining a precise area, such as the shape of a geographical area on a map.
- In the image toolbar, click the polygon shape button (next to the circle button).
- Click a point on the image to begin the drawing the shape.
- A movable, straight line will appear from the starting point. Move the line to the next desired point and click once to start the next point. Do not double-click your mouse until you are finished drawing the shape.
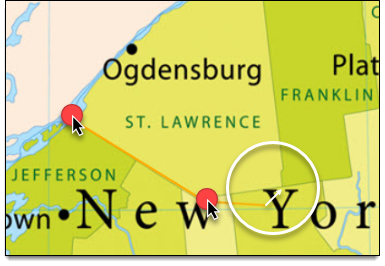
- Make sure the hot spot or area is accurate and large enough that the candidate can easily see the defined spot/area when hovering over it.
- When ready, double-click your mouse to set the final point.
- The shape is set, and its label is displayed in the center. (The label does not show to candidates; it is only shown in ExamDeveloper.)
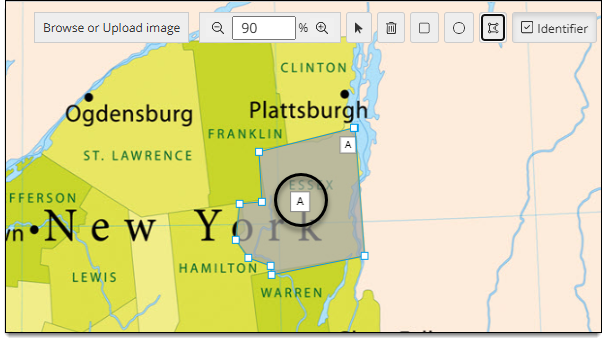
- If needed, you can move, resize, or delete the shape or change the option label.
Move a shape
- Click the Select
 button in the image toolbar.
 - Select the shape on the image.
- Hover your mouse cursor over the shape where it becomes a four-sided arrow. Then click and drag the shape to the desired location on the image.
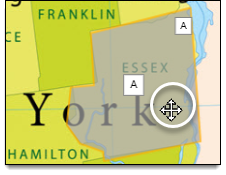
Resize a shape
- Click the Select button in the image toolbar.
- Select the shape on the image.
- Hover your mouse pointer over the shape where it becomes a vertical or horizontal double-sided arrow. Click and drag to widen or narrow the shape.
Delete a shape
- Click the Select button in the image toolbar.
- Select the shape on the image.
- Click the Delete button
 in the toolbar.
- The identifiers for all shapes will be maintained, and the next shape you add will inherit the identifier of the deleted shape. For example, say you have three shapes with identifiers A, B, and C. if you delete shape B, you must add another shape to replace B or the item will only have shapes A and C. If you only want two identifiers, A and B, you must delete shape C and create a new shape that will be assigned the identifier B.
Show response identifiers
- In the image toolbar, click Identifier.
- This shows the response identifiers for each hot spot or hot area. (Click Identifier in the toolbar again to hide them.)
- The identifier is the alphanumeric box shown in the upper-right corner of the shape. You cannot modify the identifier. The box in the center of the shape is the label, which can be modified as described in the next section. Neither the identifier nor the label are shown to candidates during exam delivery.
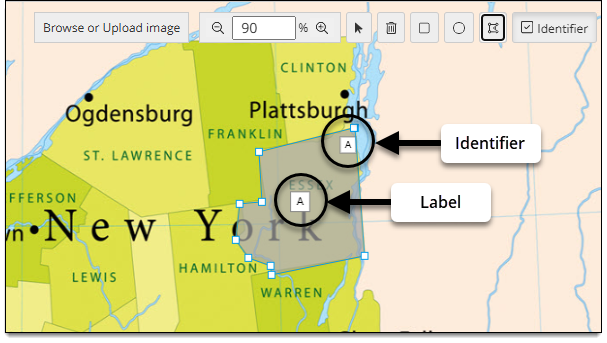
- The identifier is the alphanumeric box shown in the upper-right corner of the shape. You cannot modify the identifier. The box in the center of the shape is the label, which can be modified as described in the next section. Neither the identifier nor the label are shown to candidates during exam delivery.
Edit response labels
- Hover your mouse pointer near the center box on the shape. When the pointer changes to a cursor shape, click to begin editing the text. You can type up to 15 characters.
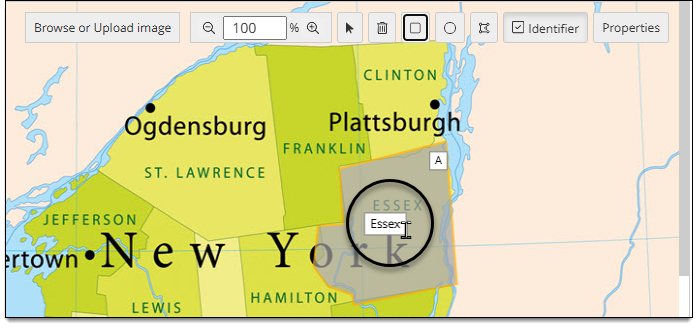
- Press Enter on your keyboard or click outside of the shape when finished.
- The new label is displayed on the image and is also shown when setting Option weights for advanced scoring in the Properties window ↑.
Configure weighted scoring
You can set different weights for each hot spot/hot area or change the total number of points awarded at the item level.
|
|
- In the image toolbar, click Properties.
- Make sure Advanced is selected in the Scoring rules.
- From the Weight drop-down, choose one of the following:
- Item allows you to change the total point value for the item.
- Option allows you to set different point values for each response option (each hot spot/hot area).
- All hot spot/hot area shapes are configured as correct responses by default. Deselect/clear the checkbox for any shapes in the Correct column that should be scored as incorrect.
- If you chose Option as the Weight type in step 3, enter a point value in the Weight fields for each hot spot/hot area shape. (Edit shape labels ↑ to help you identify each shape when assigning point values.)
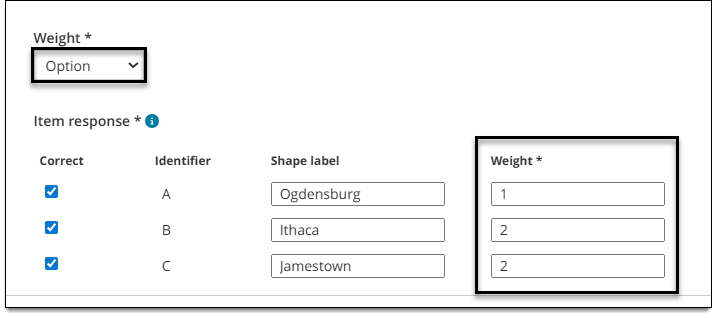
- Click Apply to save changes to the scoring rules.
How the item is scored
Scoring depends on the configurations defined in the item type template.
- With Dichotomous scoring, candidates must provide the exact response to earn a correct score for the item (they must select all of the correct hot spots/areas and none of the incorrect hot spots/areas). If any selections are incorrect or missing, the item will be marked as incorrect.
- With Advanced scoring, each individual response option (hot spot or hot area) can be worth a specified number of points (weighted response options), or authors can set a custom weight at the item level. Candidates accumulate points for each correct response.
- No scoring means there is no correct or incorrect answer. This scoring model is used for items such as survey questions or pretest items.
Additional options
See Author an item for a complete guide to item editing, including how to format text, add tables, insert images and media, apply metadata, select a blueprint area, etc.