Drag and drop (item type template)

This page describes the configurations for the Drag and drop  item type template. 

Note If new options have been added to this template since you last updated it, a notification is displayed to authors indicating that the template has not been updated. This notification will be displayed in Authoring until you enable or disable any new options and save the changes. 

Authoring tab

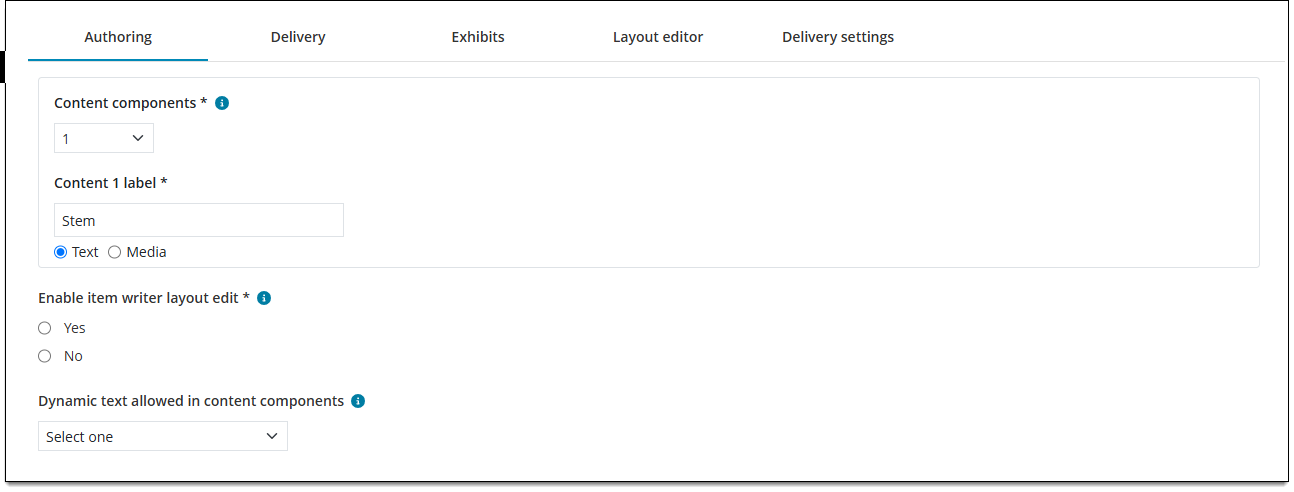
Specify the number and type of Content components and whether authors are allowed to edit the template layout and properties.
Field

Description

Content components

The number of Content components enabled for the item type. A 'Content component' is a distinct area containing either text and images (such as the question or stem) or media files (such as audio and video).

  • Note Response options are not part of Content components. 
  • Note The order of Content components in the template is the order in which they will display to candidates. 
  • Note Authors are required to add content to Text components, but are only required to add content to Media components if the validation is enabled on the Media properties tab. (Validations are enforced upon submit, not save.)
Content label 

The Content component label and the type of content to be provided (text or media). The Content label acts as a header for the content section so the author knows what content to add (such as "Introduction", "Question", "Video", etc.).  

  • Note This label is not shown to candidates during test delivery. 
  • Note The type (Text or Media) indicates what type of content is allowed for that component. Text components can include text or images. Media components can be configured for audio, video, or both. 
  • Note Authors can only add one media file per Media component. If multiple media files are required, you must add multiple Media components to the template. 
Enable item writer layout edit

Determines if authors are allowed to edit the template layout and properties.

Note Authors are always allowed to edit the content displayed on tokens, targets, and labels, set scoring rules, and edit compatible tokens. These features are separate from the layout editor. 

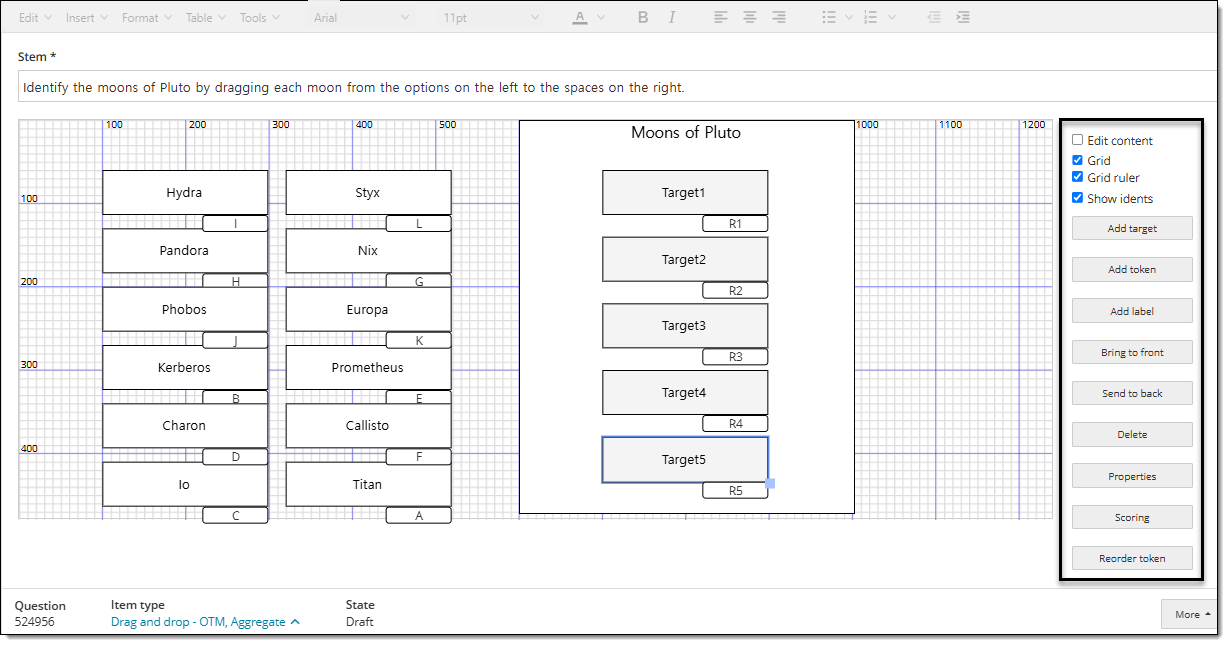
  • Yes: Authors have access to layout editing options. The author can view the grid and grid ruler, and will have access to object properties and layout settings in the right panel of the item editor. See the Layout editor section below for details. 
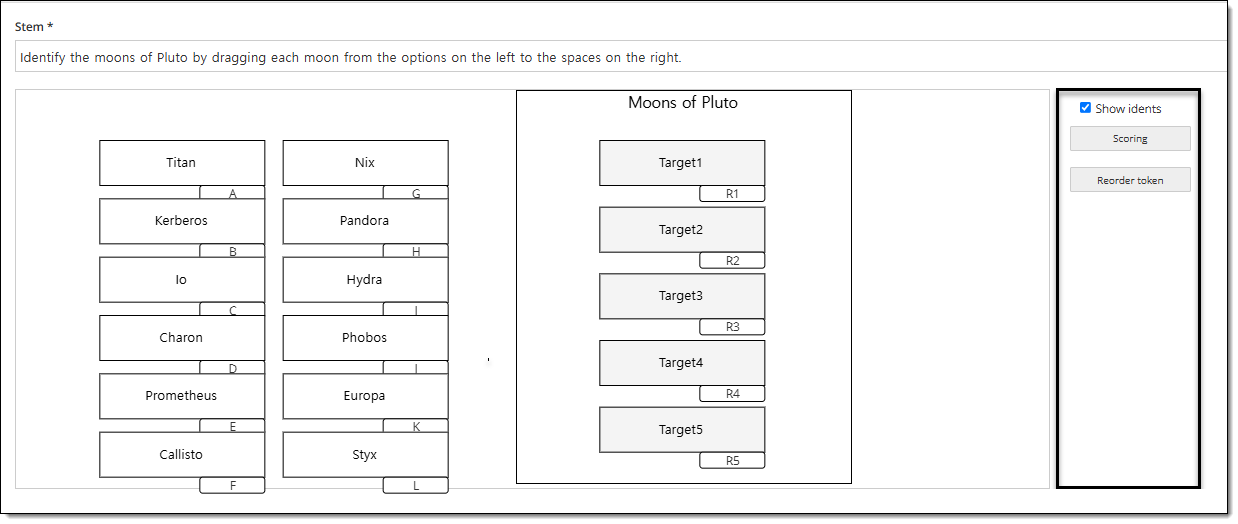
  • No: Authors do not have access to the layout editing options. They can still edit content for tokens, targets, and labels, set scoring rules, set compatible tokens, turn idents on or off, and use the Reorder tokens button.  
Dynamic text allowed in content components

Specifies whether authors can insert predefined scripts in the text components of items. When an item contains dynamic text, the content changes dynamically during exam delivery based on the script. For example, you might have dynamic content in question stems or multiple choice response options, or on display screens such as exam intros.

  • Yes: Authors can insert dynamic text in certain text components (such as the item stem). 
  • No: Authors cannot insert dynamic text anywhere in the item. 

Delivery tab

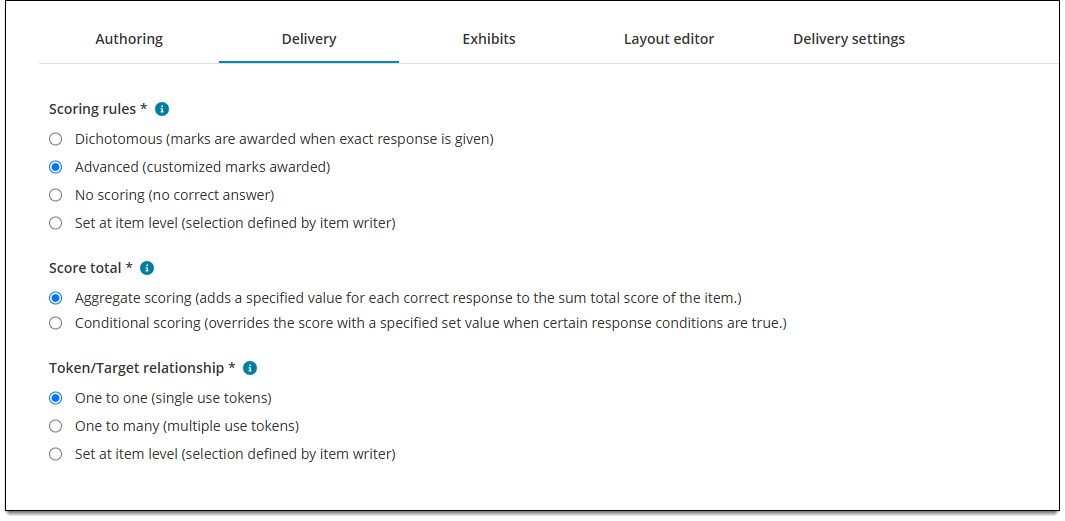
Choose scoring rules and specify token to target relationships. 
Field

Description

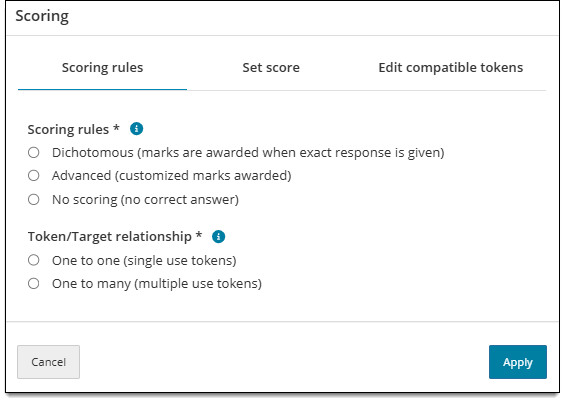
Scoring rules

The scoring rule that will be used to score the item during exam delivery.   

  • Dichotomous: The candidate must drag and drop all correct tokens to all targets to earn a correct score for the item. If any token-target match is missing or incorrect, no points will be given for the item. Weighted scoring can be applied at the item level (the item can be worth some value other than 1). 
  • Advanced: Each individual response (target) is scored independently. If Advanced is selected, Score total options must also be selected (see next row for details). 
  • No scoring: There is no 'correct' or 'incorrect' response. This scoring model is used for items such as survey questions or pretest items.
  • Set at item level: The author must choose the scoring rule from the Scoring rules tab. (This tab is only shown to authors if Set at item level is used.) Authors cannot submit the item until a scoring rule is selected.
    • Note Set at item level will be the configured scoring rule for this template, but imported items will inherit their original scoring rule at the item level. For example, if an imported Matching/Enhanced Matching item's scoring rule was previously set to Dichotomous, this scoring rule will be applied to the specific item once migration is complete —  instead of being set to Dichotomous at the template level.
Score total

Note These options are only shown if Advanced is selected as the Scoring rule. 

The score total determines how points are calculated for each target: 

  • Aggregate scoring adds a specified value for each correct response to the sum total score of the item. The maximum score for the item is the sum of score values possible across all targets.
  • Conditional scoring scores points for only specific targets or a combination of targets, depending on the rules defined for the item. The maximum score is based on either the target with the highest score value, or the last added target combination if Combination scoring is used. 
Default weight

Note These options are only shown if Dichotomous is selected as the Scoring rule. 

Set the total possible point value for the item. The default is 1, but you can input another value such as 2, which would award 2 points if the candidate submits the correct response. Any decimal value between 0.001 and 9999 is accepted, with a maximum of four characters including the decimal point.

Item weight access

Note These options are only shown if Dichotomous is selected as the Scoring rule. 

Specify which type of access authors should have to the item weight: 

  • Edit: Authors can edit the default weight value. 
  • View: Authors can see what the default weight is set to, but they cannot change it. 
  • Hidden: Authors cannot see the Item weight field when authoring the item. 
Token/target relationship

Specifies whether targets can be matched with more than one token or if only one token can be matched to each target. 

  • One to one (single use tokens): each target can only be matched with one token. Once the candidate drags a token to a target, there are no more copies of that token available. It can only be dragged to a different target if the target is empty. 
  • One to many (multiple use tokens): each target can be matched with multiple tokens. When the candidate drags a token to a target, more copies of the same token remain and can be matched to other targets. 
  • Set at item level: The author must choose the token/target relationship from the Scoring rules tab. (This tab is only shown to authors if Set at item level is used.) Authors cannot submit the item until a token/target relationship is selected.
    • Note Set at item level will be the configured token/target relationship rule for this template, but imported items will inherit their original rule at the item level. For example, if an imported Matching/Enhanced Matching item's rule was previously set to One to one, this rule will be applied to the specific item once migration is complete —  instead of being set to One to one at the template level.

Exhibits tab

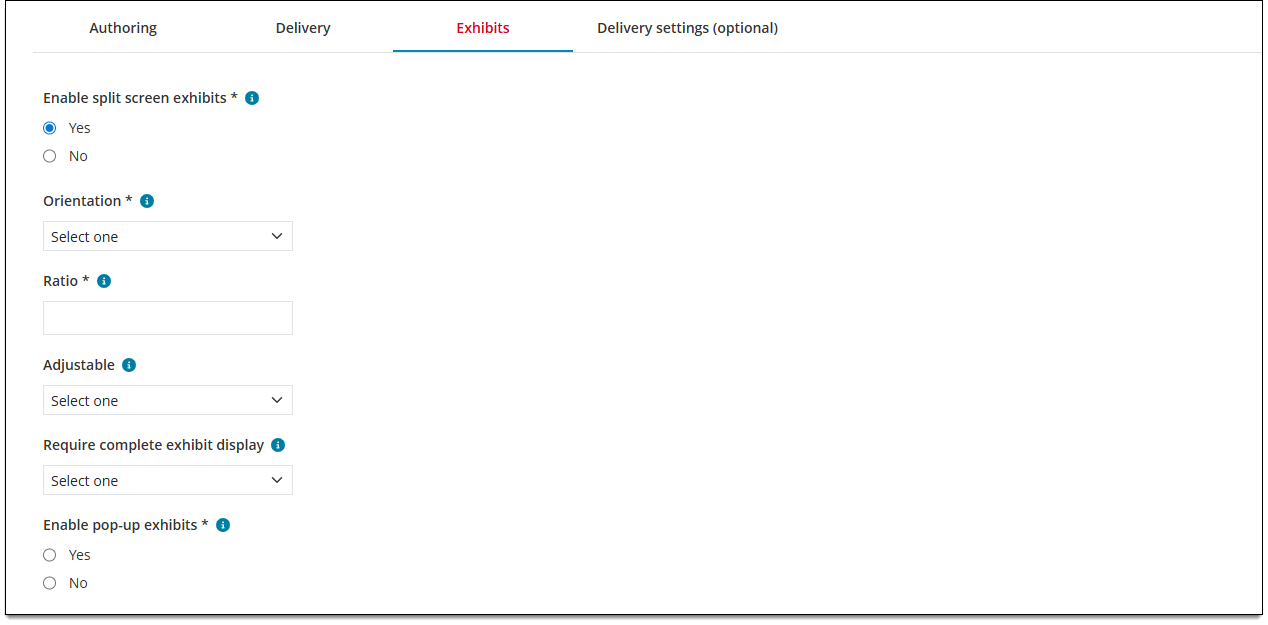
Enable or disable the ability to add split screen or pop-up exhibits to the item. About exhibitsAbout exhibits

Exhibits display supplemental information for an item question such as text passages, charts or graphs, images, audio clips, and videos. There are two types of exhibits: 

  • Split screen exhibits display content on the same page as the other item content. The exhibit content can be placed next to, above, or below the content components.
  • Pop-up exhibits display content in a pop-up window when an exhibit button is clicked. The button can be placed above or below the content components. 

Split-screen exhibits
Field

Description

Enable split screen exhibits

Enables or disables the ability for authors to add split screen exhibits to the item.

  • Yes allows authors to add split screen exhibits to the item. 
  • No disables split screen exhibits. 
Orientation

Determines where exhibits are displayed on the screen during test delivery in relation to other item content by default*. For example, "Left" places exhibit content on the left side of the screen and question/response content on the right side.

Note Exhibits will always show on the left side of the screen when authoring the item. Orientation sets exhibit placement only for test delivery, or what the candidate will see. However, each orientation option can be viewed by authors using the Preview option. 

Note Authors can change this setting at the item level in the Authoring application.

Ratio

Determines how much screen space the exhibit will occupy (i.e., the ratio of exhibit content to other item content in terms of screen space). You must enter a value between 0 and 1 up to one decimal place (e.g., "0.5" not "0.55") or use the arrows to set the default* ratio. 

For example, "0.4" sets the exhibit content to occupy 40% of the screen and all other content to occupy 60%. 

Note Authors can change this setting at the item level in the Authoring application.

Adjustable

Determines if the candidate can click and drag to adjust the size of the split screen exhibit (the amount of space occupied by the exhibit versus the item content). 

  • True: Candidates can adjust the size of the split-screen exhibit display. 
  • False: Candidates cannot adjust the size of the split-screen exhibit display. 
Require complete exhibit display

Determines if the candidate is required to view the entire contents of the exhibit before proceeding to the next item. 

  • True: Candidates must view all contents of the exhibit (including any required scrolling) in order to proceed to the next item. 
  • False: Candidates are not required to view all contents of the exhibit (including any required scrolling) in order to proceed to the next item. 

Pop-up exhibits

Field

Description

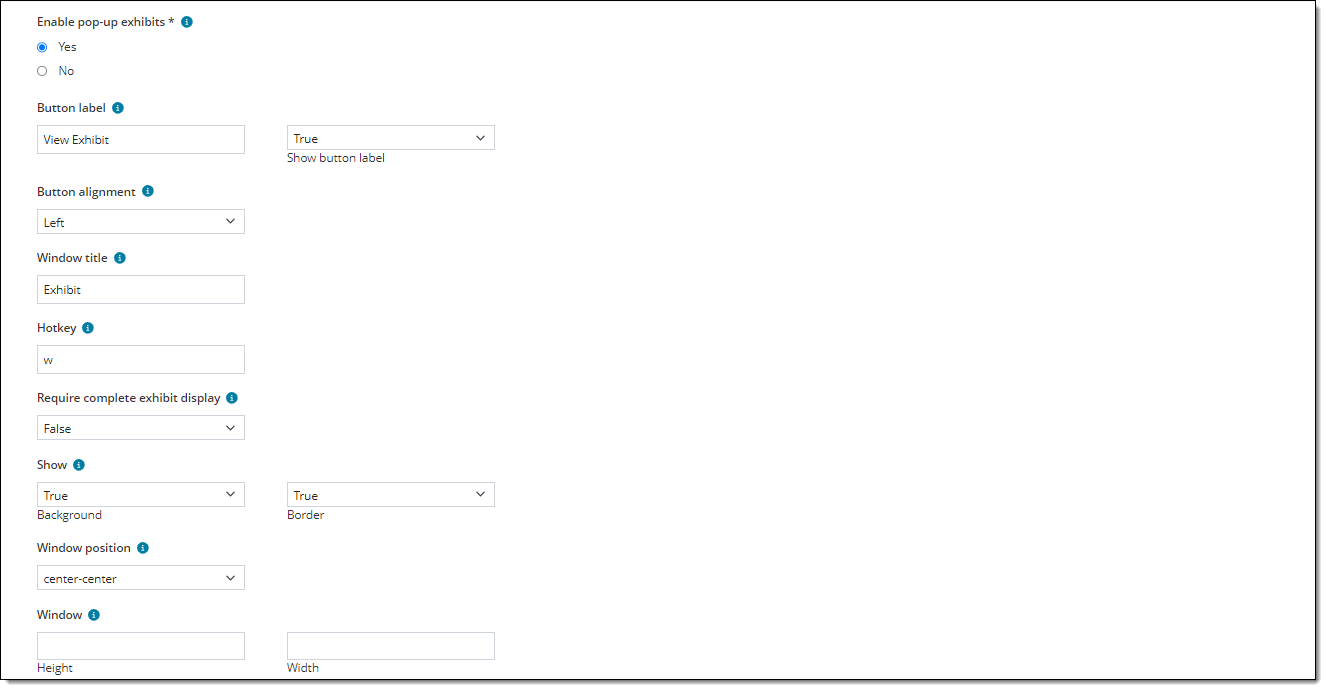
Enable pop-up exhibits

Enables or disables the ability for authors to add pop-up exhibits to the item.

  • Yes allows authors to add pop-up exhibits to the item.
  • No disables pop-up exhibits. 
Button label

Enter text to be displayed on the button; for example, "View Exhibit". If you don't enter any text, the label will default to "Exhibit". 

Show button label

Choose one of the following: 

  • True: The text you entered in the Button label field will be displayed on the button. ("Exhibit" will be displayed if no text is entered for the Button label and Show button label is set to True.)
    A button with the word "Exhibit" and an image of an easel displayed on it.
  • False: The button will not show any text and only an icon will be displayed on the button.
    A button with just an image of an easal.
Button alignment

Choose an option to configure where the exhibit button is displayed on the screen during test delivery in relation to the item content components. 

  • Left: The exhibit button is aligned with the far left side of the item content components. 
  • Center: The exhibit button is aligned with the center of the item content components. 
  • Right: The exhibit button is aligned with the far right side of the item content components. 
Window title

Enter text to be displayed across the top of the exhibit pop-up window; for example, "Exhibit". 

Hotkey

Enter a single alphanumeric character that can be used in conjunction with the Alt key on the keyboard to open the exhibit. 

Require complete exhibit display

Choose one of the following options: 

  • True: Candidates must view all contents of the pop-up exhibit window (including all tabs if multiple exhibits are included) before they can select a response for the item. 
  • False: Candidates are not required to open the exhibit or view all of the contents. 
Show (Background)

Choose one of the following options: 

  • True: The default background color of the button is displayed during test delivery. 
  • False: The default background color of the button is not displayed during test delivery (the button color is transparent). 
Show (Border)

Choose one of the following options: 

  • True: The border of the button is displayed during test delivery. 
  • False: The border is not displayed during test delivery. 
Window position

Choose an option to configure where the pop-up exhibit window is opened on the screen by default* when the exhibit button is clicked. For example, top-right opens the exhibit window in the top-right corner of the screen, while center-center opens the window in the center of the screen.

Note Candidates can click and drag the pop-up window around the screen to the desired location. 

Window (Height, Width)

If desired, enter a specific height and width for the pop-up exhibit window. To use the default size, leave these fields blank. The values you enter will specify a percentage of the screen resolution used during test delivery. 

  • The values must be a non-zero integer; no decimals are permitted.


Layout editor

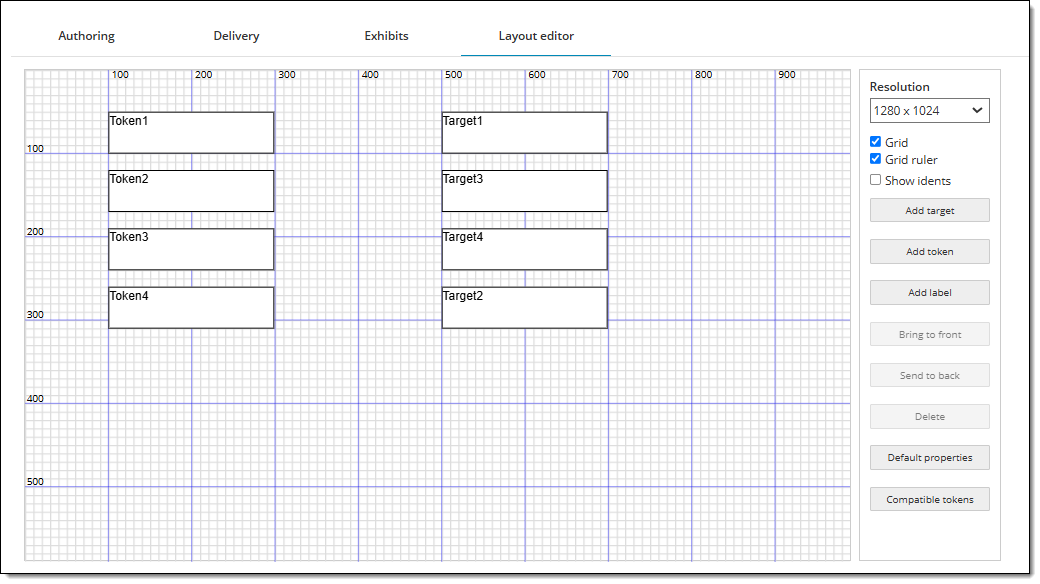
The layout editor provides additional editing options for objects (tokens, targets, and labels) in the template grid. Editing options include location, color, text formatting, and size. 

Note If Enable item writer layout edit is set to No (on the Authoring tab described above), the layout editor is only visible to item bank managers and cannot be used by item authors. 

Field Description
Resolution

The resolution of the grid in pixels. This defines the width and height of the area in which objects (tokens, targets, and labels) can be added.

Note The resolution cannot be changed by any user within the Authoring application.  

Grid

Select or deselect this option to show or hide the grid.

  • When the grid is shown, tokens, targets, and labels will automatically snap to the nearest line on the grid when a user drags and drops it to another location. 

Note If the layout editor is hidden from authors, only item bank managers can access the grid. 

Grid ruler

Select or deselect this option to show or hide the grid ruler.

  • When selected, the numbers of the grid measurements in pixels are displayed. 

Note If the layout editor is hidden from authors, only item bank managers can access the grid ruler. 

Show idents

Show or hide the idents for the response options (tokens) and response fields (targets).

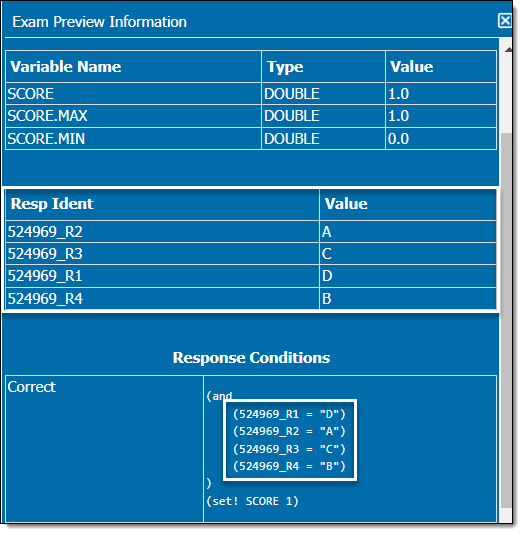
  • Idents are exported in exam QTI and shown in the Exam Info window of an item preview to test the scoring settings for the item.
  • Idents are not displayed to candidates during exam delivery. 

Note This option is available to all users, even if the layout editor is hidden from authors. 

Add target

Click to add a target to the template. Targets are initially added to the upper-left corner of the grid space and can be moved once added.

Note If the layout editor is hidden from authors,  make sure to add the total number of targets needed for the item type since authors will not be able to add or remove them. 

Add token

Click to add a token to the template. Tokens are initially added to the upper-left corner of the grid space and can be moved once added.

Note If the layout editor is hidden from authors, make sure to add the total number of tokens needed for the item type since authors will not be able to add or remove them. 

Add label

Click to add a label to the template. Labels are initially added to the upper-left corner of the grid space and can be moved once added.

Note If the layout editor is hidden from authors, make sure to add the total number of labels needed for the item type since authors will not be able to add or remove them. 

Bring to front

Select a token, target, or label and click Bring to front to place it on top of all other objects. 

Note If the layout editor is hidden from authors, only item bank managers can move objects. 

Send to back

Select a token, target, or label and click Send to back to place it behind all other objects. 

Note If the layout editor is hidden from authors, only item bank managers can move objects. 

Delete

Select a token, target, or label and click Delete to remove it from the item.  

Note If the layout editor is hidden from authors, only item bank managers can delete objects. 

Default properties 

Note You must deselect all objects in the grid to access this option.

Default properties define the initial appearance and location of objects and are only applied to new tokens, targets, or labels that are added to the template after the default properties are saved.

View Default PropertiesView Default Properties 

Field

Description

Background

Change the background appearance of a token, target, or label. Only one of the following can be used at a time: 

  • Color: Type the color's hex value in the provided text box or click the colored box to view the color palette or define other color modes such as RGB.
  • Transparent: Select Yes to make the background transparent. (Note: If a color was previously selected, you may need to close and reopen the Properties window in order to display the Transparent options.) 
  • Background image: Click Browse and select an image to use as the background. Once you select an image, any color or transparency settings will be removed. You may also need to adjust the size of the token, target, or label to display the entire image.
Border

Change the border appearance of a token, target, or label. 

  • Weight: Type a whole number or use the up and down arrow keys to designate the width of the border. Enter "0" if you don't want to use a border. 
  • Color: Type the color's hex value in the provided text box or click the colored box to view the color palette or define other color modes such as RGB.
Size

Specify an exact height and width of the token, target, or label. Measurements are in pixels and correspond to the grid ruler. Show the grid and grid ruler in the layout editor to verify or preview size change. 

  • Height: The height of the object, corresponding to measurements along the vertical axis of the grid. 
  • Width: The width of the object, corresponding to measurements along the horizontal axis of the grid. 

Note All targets must be the same size or larger than all tokens. No target can be smaller than any target. 

Font

Customize various formatting options for the text inside a token, target, or label. 

Note Text inside an object can have more than one style applied (such bold and italic) but only one Color, Font face, and Size can be applied at a time for each object.

  • Color: Type the color's hex value in the provided text box or click the colored box to view the color palette or define other color modes such as RGB.
  • Font face: Select a font from the menu. These are the same font options that can be used in the content components, such as the item stem/question. 
  • Size (pt): Select a font size from the menu. 
Text Align

Specify the alignment of text within the token, target, or label. 

  • Horizontal: The location of the text corresponding to the horizontal length of the object (Left, Center, or Right). For example, "Left" aligns text to the far-left side of the object while "Center" aligns text in the center of the object. 
  • Vertical: The location of the text corresponding to the vertical length of the object (Top, Center, or Bottom). For example, "Top" aligns text to the top of the object while "Center" aligns text in the middle of the object.

Note If the layout editor is hidden from authors, only item bank managers can view and edit default object properties. 

Properties

Select a single token, target, or label or select multiple by holding the Control key on the keyboard while selecting objects.

View PropertiesView Properties

Field

Description

Ident

If desired, enter a new ident for a response option (token) or response field (target). 

  • Token idents: By default, each added token is labeled alphabetically starting with A, then B, then C, and so on (similar to a multiple choice question with response options labeled A, B, C, and D). You can change the ident to something else such as numbers or alphanumeric idents such as 1A, 1B, etc.
  • Target idents: By default, each added target is labeled with the letter R followed by consecutive numbers starting with 1 such as R1, R2, R3, etc. You can change the ident to something else such as T1 or Response 1. Note: Each target ident will automatically be appended with the item ident and an underscore to ensure that the response field is unique for the exam. For example, if the item ident is "123456" and you change a target's ident to "Response A", the generated ident will be "123456_Response A". 

Idents are exported in the exam QTI. They are also used by item authors to test the scoring of an item in the Exam Info window of the item preview. Token idents are displayed as a "Value" in the Exam Info window of the item preview. Target idents are displayed as a "Resp_Ident" in the Exam Info window of the item preview.  

Default text

Default text is defined by the item bank manager and cannot be changed. "Default" refers to the text that is initially populated inside a token, target, or label.

Background

Change the background appearance of a token, target, or label. Only one of the following can be used at a time: 

  • Color: Type the color's hex value in the provided text box or click the colored box to view the color palette or define other color modes such as RGB.
  • Transparent: Select Yes to make the background transparent. (Note: If a color was previously selected, you may need to close and reopen the Properties window in order to display the Transparent options.) 
  • Background image: Click Browse and select an image to use as the background. Once you select an image, any color or transparency settings will be removed. You may also need to adjust the size of the token, target, or label to display the entire image.
Border

Change the border appearance of a token, target, or label. 

  • Weight: Type a whole number or use the up and down arrow keys to designate the width of the border. Enter "0" if you don't want to use a border. 
  • Color: Type the color's hex value in the provided text box or click the colored box to view the color palette or define other color modes such as RGB.
Location

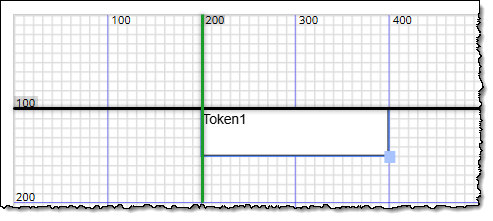
Specify exact coordinates of the token, target, or label within the layout grid. (Note: This is an alternative to dragging and snapping objects to the grid.) Show the grid and grid ruler in the layout editor to see where the object was/will be moved. The grid measurements are in pixels. 

  • Left: Type a number to specify a coordinate along the horizontal axis of the layout grid. The left side of the object will align with the coordinate on the horizontal axis.  
  • Top: Type a number to specify a coordinate along the vertical axis of the layout grid. The top of the object will align with the coordinate on the vertical axis.

In the example image below, Left = "200" and Top = "100": 

Size

Specify an exact height and width of the token, target, or label. Measurements are in pixels and correspond to the grid ruler. Show the grid and grid ruler in the layout editor to verify or preview size change. 

  • Height: The height of the object, corresponding to measurements along the vertical axis of the grid. 
  • Width: The width of the object, corresponding to measurements along the horizontal axis of the grid. 

Note All targets must be the same size or larger than all tokens. No target can be smaller than any target. 

Font

Customize various formatting options for the text inside a token, target, or label. 

Note Text inside an object can have more than one style applied (such bold and italic) but only one Color, Font face, and Size can be applied at a time for each object.

  • Color: Type the color's hex value in the provided text box or click the colored box to view the color palette or define other color modes such as RGB.
  • Font face: Select a font from the menu. These are the same font options that can be used in the content components, such as the item stem/question. 
  • Size (pt): Select a font size from the menu. 
Text Align

Specify the alignment of text within the token, target, or label. 

  • Horizontal: The location of the text corresponding to the horizontal length of the object (Left, Center, or Right). For example, "Left" aligns text to the far-left side of the object while "Center" aligns text in the center of the object. 
  • Vertical: The location of the text corresponding to the vertical length of the object (Top, Center, or Bottom). For example, "Top" aligns text to the top of the object while "Center" aligns text in the middle of the object.

Note If the layout editor is hidden from authors, only item bank managers can view and edit object properties.  

Compatible tokens

By default, all tokens are compatible with all targets (each token can be matched to any target).

To remove compatibility from a token-target pair, deselect the checkbox in the target's row and token's column. This will restrict the token from being matched to that target. For example, if you deselect the checkbox for Target 1 and Token 4, candidates will not be able to match Token 4 to Target 1. 

Note Only item bank managers can set default compatible tokens. However, authors can change compatible tokens from the default settings when authoring the item. 

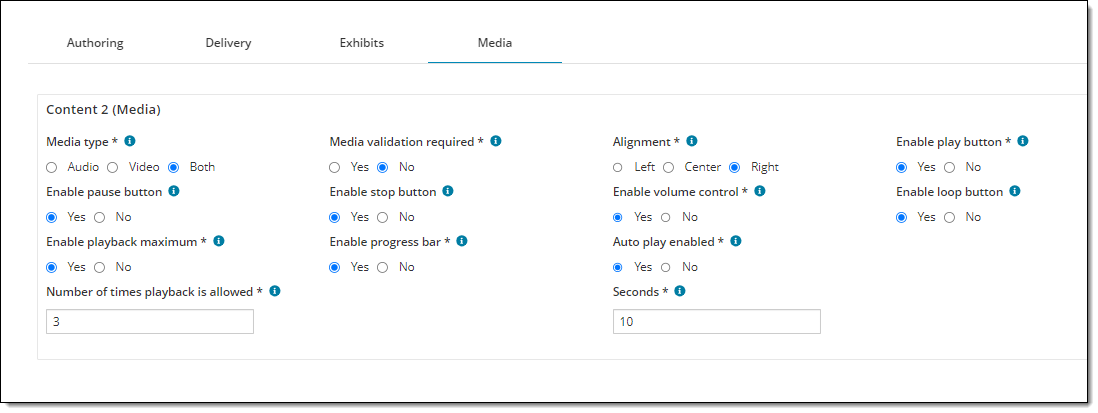
Media tab

Choose media settings for items that contain audio or video.

  • The Media tab is not visible until a Media component has been added on the Authoring properties tab. If multiple Media components are added, a separate section is shown for each component ("Content 1", "Content 2", etc.). You must choose settings for each Media component.
  • Media files must be hosted in the Media Content Deployer application before they can be added to an item.
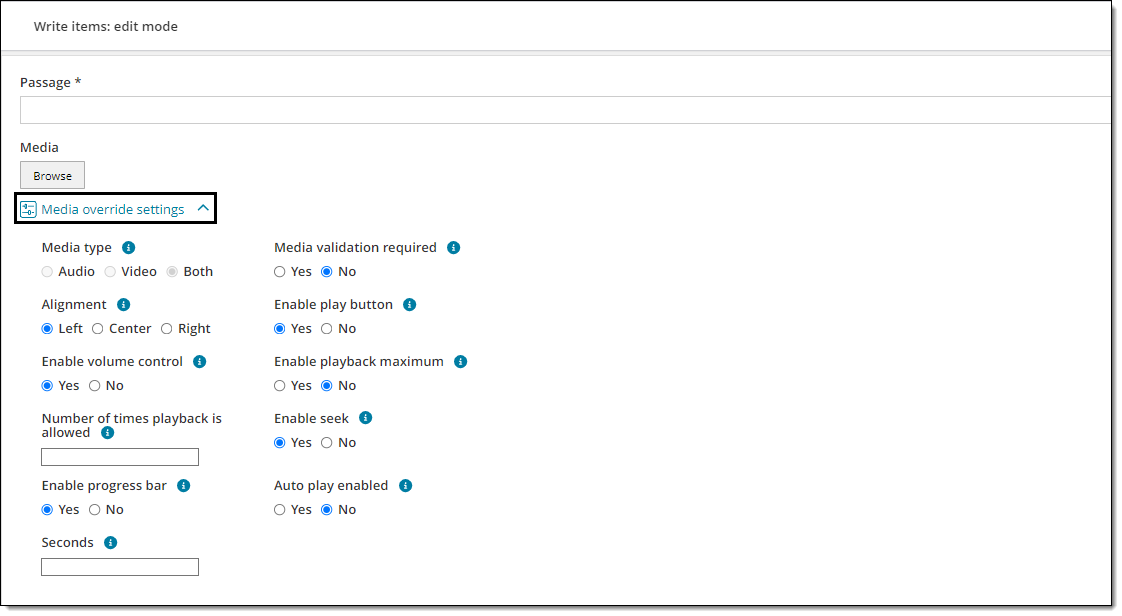
  • Item bank managers can override media settings in the Authoring application by expanding the Media override settings menuMedia override settings menu.  
Field

Description

Media type

Determines which type of media can be added by authors (Audio, Video, or Both). 

Note When browsing for media files to add, authors will only see files that match the supported file type for the selected media (e.g., only audio file types for Audio, only video files for Video, or all media files for Both). 

Media validation required

Determines whether or not authors are required to add a media file to a Media section before they can submit the item. 

  • Yes: Authors are required to add a media file before submitting the item. The item can still be saved without adding a media file. 
  • No: Authors are not required to add a media file before submitting the item. 
Alignment

Determines where the media player is aligned on the screen (left, center, or right) during test delivery. 

Enable play button

Enables (Yes) or disables (No) the play button on the media player.

Enable pause button

Enables (Yes) or disables (No) the pause button on the media player. 

  • If Yes, the media file can be paused. When the play button is clicked after pausing, the media will continue playing from the point where it was stopped. 
  • If No, the media file can only be stopped and cannot be paused. Each time the media file is stopped it will return to the beginning of the clip. 
Enable stop button

Enables (Yes) or disables (No) the stop button on the audio or video player.

If you disable the stop button, the entire media file will be played without stopping unless a pause button is enabled. 

Enable volume control

Enables (Yes) or disables (No) the volume control slider on the audio or video player.

Note If No is selected, volume control is hidden and the loudest volume level will be used by default. If you plan to disable volume control, make sure to test the media clip to ensure an appropriate volume level for test delivery. 

Enable loop button

Enables (Yes) or disables (No) the loop button on the media player. 

Note The loop button will not work unless a play button is also enabled.  

  • If Yes, the media will continuously replay itself once the play button is clicked, unless the pause or stop button is clicked (in which case a pause or stop button must be enabled). If a playback maximum is set, the media will loop itself until the maximum number of playbacks is reached. Note: the stop button is disabled if playback maximum is set, so only a pause button can be used to manually stop looping once it is started. 
  • If No, the media cannot be looped and the play button must be clicked each time the user wishes to play the media clip. 
Enable playback maximum

Allows you to set a limit on the number of times a media file can be played by the candidate during test delivery.

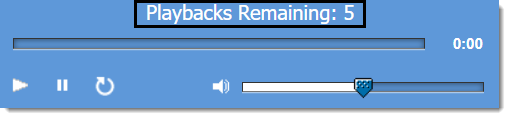
The media player is shown with the text "Playbacks Remaining: 5" at the top.

 If a playback maximum is set, the seek and stop functions will be disabled during test delivery. (The seek bar and stop button will not be shown on the media player.)  

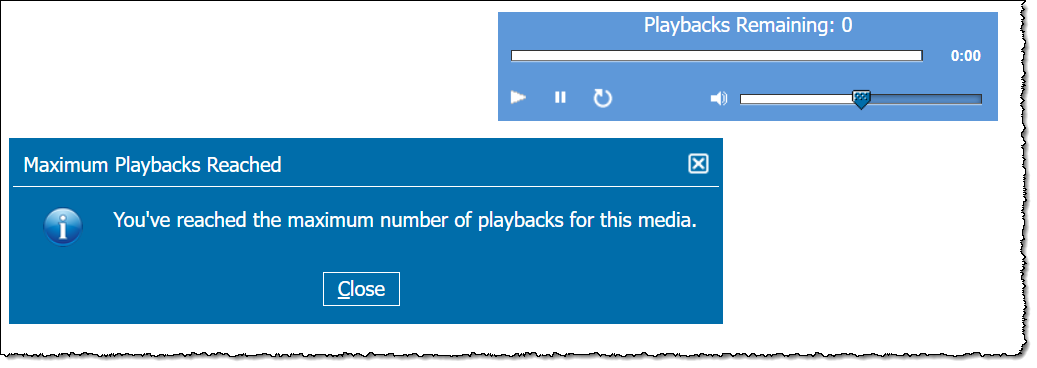
  • Yes: enforces a limit on the number of times the media can be played. You must also enter a number in the Number of times playback is allowed. The number of remaining playbacks is shown on the media player, and a pop-up message is displayed if the candidate reaches the maximum number of playbacks. See exampleSee example


  • No: the media can be played an unlimited number of times and no playback maximum is displayed on the media player. 
Number of times playback is allowed 

Note This configuration is only shown if Yes is selected for Enable playback maximum.

The maximum number of times the media can be played. For example, if "5" is entered candidates can only play the media five times total during test delivery.  

Enable progress bar

Enables (Yes) or disables (No) the progress bar on the audio or video player.

The media player is shown with the progress bar at the top.

  • If Yes, candidates can see how much time has elapsed or is remaining. 
  • If No, candidates cannot see how much time has elapsed or is remaining.  
Auto play enabled

Enables or disables media auto play. 

  • If Yes, the video or audio starts playing once the item is displayed.
  • If No, the Play button must be clicked for the media to start. 
Seconds

Note This configuration is only shown if Yes is selected for Auto play enabled.

Enter the number of seconds that should pass before the audio or video is automatically played. Countdown starts from the time the item is displayed or navigated to during test delivery. 

Enable seek

Note This configuration is only shown if No is selected for Enable playback maximum.

Allows users to manually move forward or backward on the media timeline by dragging a slider. 

Note In order for the seek function to work, the progress bar must also be enabled. 

  • If Yes, the progress bar will include a slider that users can drag back and forth along the media timeline. 
  • If No, the progress bar (if enabled) will only show the time elapsed; no slider will be available. 

Delivery settings tab (optional) 

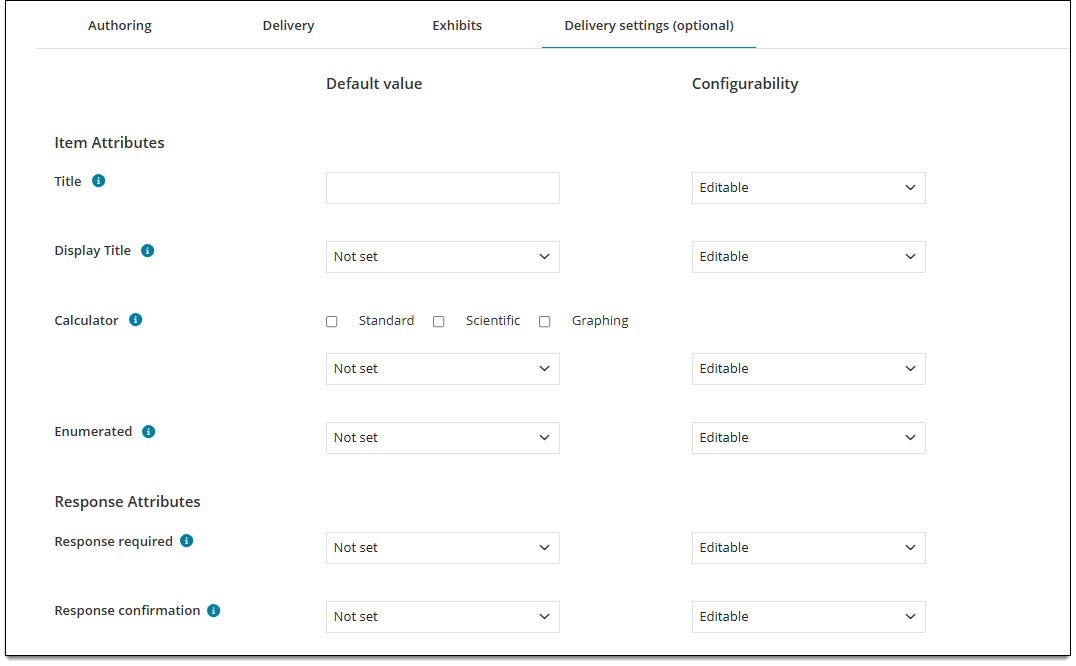
Choose default settings for item and response attributes that are used or displayed during exam delivery, such as shuffled responses, response confirmations, and calculators. 
Item attributes

Note Any field with a Configurability set as Select one will be hidden from writers and reviewers at the item level. (Project Managers will always see it.)

Field

Description

Title

Default value

  • Enter a default item title. The title will display on the item review screen during exam delivery if idents are hidden and Display title (see below) is set to True. 

Configurability 

  • Editable: Authors can change the title for an item. 
  • Viewable: The title will display grayed out so that writers and reviewers can see it, but not change it. (Project managers can still override in Authoring.)
  • Select one: The field will be hidden from writers and reviewers at the item level. (Project Managers will always see it.)
Display title

Default value

  • Select True to display the item's title during exam delivery, or False to hide it during exam delivery (only ExamDeveloper users can see the title). The title will display on the item review screen during exam delivery if idents are hidden and a Title has been added (see above).
  • If you select Not set, no QTI values for this setting will be exported.

Configurability 

  • Editable: Authors can change the True or False selection. 
  • Viewable: The field will be grayed out so that writers and reviewers can see what the current setting is, but they cannot change it. (Project managers can still override in Authoring.)
  • Select one: The field will be hidden from writers and reviewers at the item level. (Project Managers will always see it.)
Calculator

Default value

  • Select Standard, Scientific, and/or Graphing. The options you select determine which calculator types and combinations are available for the author to select and apply to the item. 
  • If you select a calculator type or combination of types from the drop-down menu, that option you select will be selected by default for all items using this template. Authors and reviewers can still change it (if Configurability is set to Editable). If you choose Not set, no calculator types are selected by default and the author/reviewer will choose a type .

Configurability 

  • Editable: Authors can change the calculator type. 
  • Viewable: The field will be grayed out so that writers and reviewers can see which calculator is used but cannot change it. (Project managers can still override in Authoring.)
  • Select one: The field will be hidden from writers and reviewers at the item level. (Project Managers will always see it.)
Enumerated 

Default value

  • Select False to exclude items using this template from the numbering sequence in the review screen, or select True to include them. If you select Not set, no QTI values for this setting will be exported. About enumerationAbout enumeration

    By default, all items are numbered in the review screen. When you exclude an item from numbering, the next item in the list uses the subsequent numbering. For example, if the first item is excluded from the numbering; the second item is assigned the value of 1. If the fifth item is also excluded from the numbering, the sixth item is assigned the number 4.

Configurability 

  • Editable: Authors can change the True or False selection. 
  • Viewable: The field will be grayed out so that writers and reviewers can see what the current setting is, but they cannot change it. (Project managers can still override in Authoring.)
  • Select one: The field will be hidden from writers and reviewers at the item level. (Project Managers will always see it.)

Response attributes

Field

Description

Shuffle response 

Default value

Determines if the 'shuffle response' feature is enabled for this item.

  • Select Yes to enable shuffled responses (response options will be displayed in a random order) or No to disable shuffled responses (response options will always be displayed to candidates in the same order - which is the order displayed in the item editor). If you select Not set, no QTI values for this setting will be exported. 
  • Note For Grid multiple choice - one correct and Grid multiple choice - multiple correct templates, this field will always be set and exported as "No" and cannot be changed in ExamDeveloper.

Configurability 

  • Editable: Authors can change the True or False selection. 
  • Viewable: The field will be grayed out so that writers and reviewers can see what the current setting is, but they cannot change it. (Project managers can still override in Authoring.)
  • Select one: If you select Not set, no QTI values for this setting will be exported. 
Response required

Default value

Determines if the candidate must enter a complete response for the item before navigating away from it.

  • Select True to require a response (a message is displayed if the response is incomplete or unanswered and the candidate is unable to proceed until a response is entered) or False to allow candidates to proceed without answering the item completely. If you select Not set, no QTI values for this setting will be exported. 

Configurability 

  • Editable: Authors can change the True or False selection. 
  • Viewable: The field will be grayed out so that writers and reviewers can see what the current setting is, but they cannot change it. (Project managers can still override in Authoring.)
  • Select one: The field will be hidden from writers and reviewers at the item level. (Project Managers will always see it.)
Response confirmation

Default value

Determines if candidates will be prompted to confirm their answer to an item before navigating away from it. This is often used for exams that don't allow candidates to go back to an item once it has been answered.  

  • Select True to enforce the confirmation prompt or select False to disable the prompt and allow candidates to proceed without confirming. If you select Not set, no QTI values for this setting will be exported. 

Configurability 

  • Editable: Authors can change the True or False selection. 
  • Viewable: The field will be grayed out so that writers and reviewers can see what the current setting is, but they cannot change it. (Project managers can still override in Authoring.)
  • Select one: The field will be hidden from writers and reviewers at the item level. (Project Managers will always see it.) 
No response confirmation

Default value

Determines if the candidate must enter a complete response for the item before navigating away from it. 

  • Select True to require a response (a message is displayed if the response is incomplete or unanswered and the candidate is unable to proceed until the response is complete) or select False to allow candidates to proceed without answering the item completely. If you select Not set, no QTI values for this setting will be exported. 

Configurability 

  • Editable: Authors can change the True or False selection. 
  • Viewable: The field will be grayed out so that writers and reviewers can see what the current setting is, but they cannot change it. (Project managers can still override in Authoring.)
  • Select one: The field will be hidden from writers and reviewers at the item level. (Project Managers will always see it.)